模型部署是将转换好的 BModel 模型在 CV186AH 硬件上实际运行的环节,主要依赖sophon-sail 库(官方封装的推理接口)实现,支持 Python 和 C++ 两种开发方式,下面我会详细讲解完整的部署流程和实操案例。

一、部署前准备工作
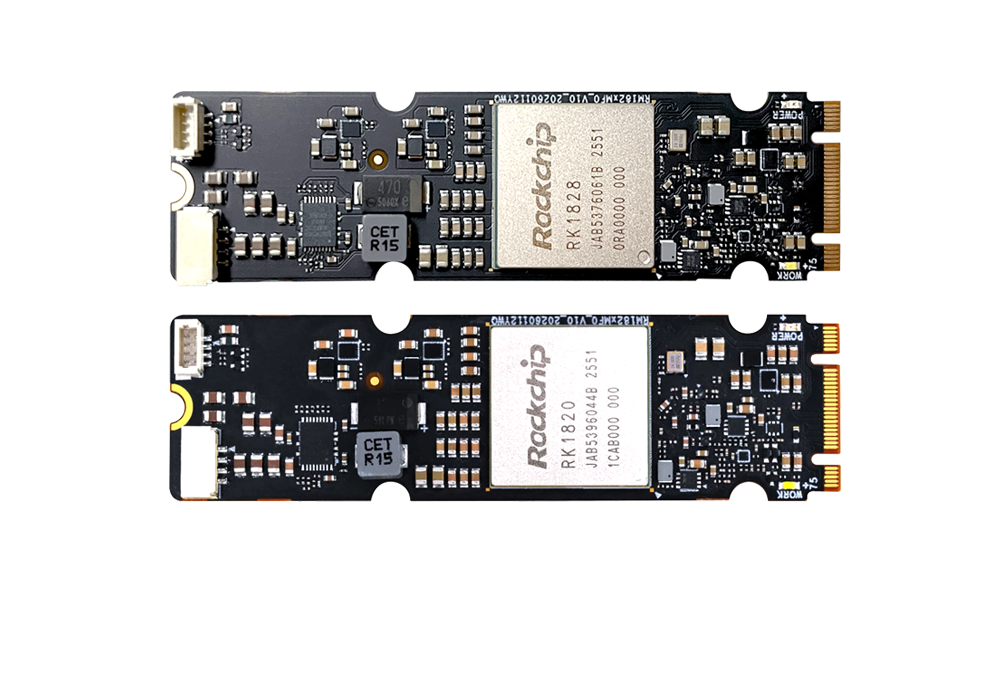
1. 目标板环境配置
首先需要在 CV186AH 核心板上配置运行环境,安装依赖库:
# 1. 更新系统源(以Debian/Ubuntu为例)
sudo apt update && sudo apt upgrade -y
# 2. 安装必要依赖
sudo apt install -y python3 python3-pip libopencv-dev python3-opencv
# 3. 安装官方sophon-sail库(根据SDK版本选择,推荐从SDK中安装)
# 方式1:从算能SDK安装
sudo dpkg -i sophon-sail_*.deb
# 方式2:Python pip安装(若支持)
pip3 install sophon-sail
2. 模型与文件准备
将转换好的 BModel 模型(如yolov5s_int8.bmodel)拷贝到 CV186AH 核心板(可通过 SCP/U 盘 / 网络共享)。
准备测试图片 / 视频文件(用于推理验证)。
二、Python 部署(快速验证,适合原型开发)
Python 部署基于sophon-sail的 Python API,代码简洁,适合快速验证模型效果。
1. 完整部署示例(YOLOv5 模型)
import sophon.sail as sail
import cv2
import numpy as np
class YOLOv5Deploy:
def __init__(self, bmodel_path):
# 1. 初始化推理引擎(指定BModel路径和设备ID)
self.engine = sail.Engine(bmodel_path, 0, sail.IOMode.SYSO)
# 2. 获取模型信息(输入输出形状、数据类型)
self.graph_name = self.engine.get_graph_names()[0] # 第一个模型
self.input_name = self.engine.get_input_names(self.graph_name)[0]
self.output_names = self.engine.get_output_names(self.graph_name)
# 3. 获取输入输出形状
self.input_shape = self.engine.get_input_shape(self.graph_name, self.input_name)
self.input_h, self.input_w = self.input_shape[2], self.input_shape[3]
def preprocess(self, img):
"""图像预处理:缩放、归一化、转NCHW格式"""
# 缩放图像到模型输入尺寸
img_resized = cv2.resize(img, (self.input_w, self.input_h))
# BGR转RGB(若模型训练时用RGB)
img_rgb = cv2.cvtColor(img_resized, cv2.COLOR_BGR2RGB)
# 归一化(根据模型训练时的预处理参数调整)
img_norm = img_rgb.astype(np.float32) / 255.0
# 转NCHW格式(模型输入要求)
img_nchw = np.transpose(img_norm, (2, 0, 1))[None, ...] # 添加batch维度
return img_nchw, img_resized.shape[:2]
def postprocess(self, outputs, img_shape, conf_thres=0.5, iou_thres=0.45):
"""后处理:解析输出,非极大值抑制(NMS)"""
# 解析YOLOv5输出(假设输出为[batch, num_boxes, 85])
pred = outputs[0].reshape(-1, 85)
# 筛选置信度>阈值的框
boxes = pred[pred[:, 4] > conf_thres]
# 提取坐标、置信度、类别
xyxy = self.xywh2xyxy(boxes[:, :4])
conf = boxes[:, 4]
cls = boxes[:, 5:].argmax(1)
# NMS非极大值抑制
indices = cv2.dnn.NMSBoxes(xyxy[:, :4].tolist(), conf.tolist(), conf_thres, iou_thres)
# 缩放框到原图尺寸
scale_h, scale_w = img_shape[0]/self.input_h, img_shape[1]/self.input_w
final_boxes = []
for i in indices:
i = i[0] if isinstance(i, (list, np.ndarray)) else i
box = xyxy[i]
box[0] *= scale_w
box[1] *= scale_h
box[2] *= scale_w
box[3] *= scale_h
final_boxes.append({
"box": box.astype(int),
"conf": conf[i],
"cls": cls[i]
})
return final_boxes
def xywh2xyxy(self, x):
"""将YOLO的xywh格式转为xyxy格式"""
y = np.copy(x)
y[:, 0] = x[:, 0] - x[:, 2] / 2 # x1
y[:, 1] = x[:, 1] - x[:, 3] / 2 # y1
y[:, 2] = x[:, 0] + x[:, 2] / 2 # x2
y[:, 3] = x[:, 1] + x[:, 3] / 2 # y2
return y
def infer(self, img_path):
"""完整推理流程:预处理→推理→后处理"""
# 读取图片
img = cv2.imread(img_path)
if img is None:
raise ValueError("无法读取图片")
# 预处理
input_data, img_shape = self.preprocess(img)
# 执行推理
outputs = self.engine.process(self.graph_name, {self.input_name: input_data})
# 后处理
results = self.postprocess(outputs, img_shape)
# 绘制结果
for res in results:
box = res["box"]
cv2.rectangle(img, (box[0], box[1]), (box[2], box[3]), (0, 255, 0), 2)
cv2.putText(img, f"cls{res['cls']}:{res['conf']:.2f}",
(box[0], box[1]-10), cv2.FONT_HERSHEY_SIMPLEX, 0.5, (0, 255, 0), 2)
return img, results
# 部署执行
if __name__ == "__main__":
# 初始化部署类(传入BModel路径)
deploy = YOLOv5Deploy("yolov5s_int8.bmodel")
# 推理测试图片
result_img, results = deploy.infer("test.jpg")
# 保存结果
cv2.imwrite("result.jpg", result_img)
print(f"检测到{len(results)}个目标")
for res in results:
print(f"类别:{res['cls']},置信度:{res['conf']:.2f},框:{res['box']}")
2. 运行 Python 部署代码
# 在CV186AH核心板上运行
python3 yolov5_deploy.py
三、C++ 部署(高性能,适合实际应用)
C++ 部署基于sophon-sail的 C++ API,性能更高,适合资源受限的边缘场景或量产应用。
1. CMake 配置(CMakeLists.txt)
cmake_minimum_required(VERSION 3.10)
project(yolov5_deploy)
# 设置C++标准
set(CMAKE_CXX_STANDARD 17)
set(CMAKE_CXX_STANDARD_REQUIRED ON)
# 查找依赖库
find_package(OpenCV REQUIRED)
find_package(sail REQUIRED)
# 包含头文件目录
include_directories(
${OpenCV_INCLUDE_DIRS}
${SAIL_INCLUDE_DIRS}
)
# 生成可执行文件
add_executable(yolov5_deploy yolov5_deploy.cpp)
# 链接库
target_link_libraries(yolov5_deploy
${OpenCV_LIBS}
${SAIL_LIBRARIES}
)
2. C++ 部署代码示例(核心部分)
#include <sail/sail.h>
#include <opencv2/opencv.hpp>
#include <vector>
#include <iostream>
struct DetectionResult {
cv::Rect box;
float conf;
int cls;
};
class YOLOv5Deploy {
private:
sail::Engine engine;
std::string graph_name;
std::string input_name;
std::vector<std::string> output_names;
int input_h, input_w;
public:
YOLOv5Deploy(const std::string& bmodel_path) {
// 初始化推理引擎
engine = sail::Engine(bmodel_path, 0, sail::IOMode::SYSO);
// 获取模型信息
graph_name = engine.get_graph_names()[0];
input_name = engine.get_input_names(graph_name)[0];
output_names = engine.get_output_names(graph_name);
// 获取输入形状
auto input_shape = engine.get_input_shape(graph_name, input_name);
input_h = input_shape[2];
input_w = input_shape[3];
}
cv::Mat preprocess(const cv::Mat& img, cv::Size& img_shape) {
// 缩放图像
cv::Mat img_resized;
cv::resize(img, img_resized, cv::Size(input_w, input_h));
img_shape = img.size();
// BGR转RGB
cv::Mat img_rgb;
cv::cvtColor(img_resized, img_rgb, cv::COLOR_BGR2RGB);
// 归一化并转NCHW
img_rgb.convertTo(img_rgb, CV_32F, 1.0/255.0);
std::vector<cv::Mat> channels(3);
cv::split(img_rgb, channels);
// 构造NCHW格式输入
cv::Mat input_data(1, 3*input_h*input_w, CV_32F);
float* ptr = input_data.ptr<float>();
for (int c = 0; c < 3; ++c) {
memcpy(ptr, channels[c].ptr<float>(), input_h*input_w*sizeof(float));
ptr += input_h*input_w;
}
return input_data;
}
std::vector<DetectionResult> postprocess(
const std::vector<sail::Tensor>& outputs,
const cv::Size& img_shape,
float conf_thres = 0.5,
float iou_thres = 0.45
) {
// 解析输出
auto output = outputs[0];
int num_boxes = output.shape(1);
float* data = output.ptr<float>();
std::vector<cv::Rect> boxes;
std::vector<float> confidences;
std::vector<int> class_ids;
for (int i = 0; i < num_boxes; ++i) {
float conf = data[i*85 + 4];
if (conf < conf_thres) continue;
// 解析坐标(xywh转xyxy)
float x = data[i*85];
float y = data[i*85 + 1];
float w = data[i*85 + 2];
float h = data[i*85 + 3];
int x1 = (x - w/2) * input_w;
int y1 = (y - h/2) * input_h;
int x2 = (x + w/2) * input_w;
int y2 = (y + h/2) * input_h;
boxes.emplace_back(x1, y1, x2-x1, y2-y1);
confidences.push_back(conf);
// 找类别
int cls = 0;
float max_cls_conf = 0;
for (int j = 5; j < 85; ++j) {
if (data[i*85 + j] > max_cls_conf) {
max_cls_conf = data[i*85 + j];
cls = j - 5;
}
}
class_ids.push_back(cls);
}
// NMS
std::vector<int> indices;
cv::dnn::NMSBoxes(boxes, confidences, conf_thres, iou_thres, indices);
// 缩放框到原图
float scale_w = img_shape.width / (float)input_w;
float scale_h = img_shape.height / (float)input_h;
std::vector<DetectionResult> results;
for (int i : indices) {
DetectionResult res;
res.box.x = boxes[i].x * scale_w;
res.box.y = boxes[i].y * scale_h;
res.box.width = boxes[i].width * scale_w;
res.box.height = boxes[i].height * scale_h;
res.conf = confidences[i];
res.cls = class_ids[i];
results.push_back(res);
}
return results;
}
cv::Mat infer(const std::string& img_path, std::vector<DetectionResult>& results) {
// 读取图片
cv::Mat img = cv::imread(img_path);
if (img.empty()) {
throw std::runtime_error("无法读取图片");
}
// 预处理
cv::Size img_shape;
cv::Mat input_data = preprocess(img, img_shape);
// 构造输入张量
sail::Tensor input_tensor = engine.get_input_tensor(graph_name, input_name);
input_tensor.from_numpy(input_data);
// 执行推理
engine.process(graph_name);
// 获取输出
std::vector<sail::Tensor> outputs;
for (const auto& name : output_names) {
outputs.push_back(engine.get_output_tensor(graph_name, name));
}
// 后处理
results = postprocess(outputs, img_shape);
// 绘制结果
for (const auto& res : results) {
cv::rectangle(img, res.box, cv::Scalar(0, 255, 0), 2);
cv::putText(img,
"cls" + std::to_string(res.cls) + ":" + std::to_string(res.conf),
cv::Point(res.box.x, res.box.y - 10),
cv::FONT_HERSHEY_SIMPLEX, 0.5, cv::Scalar(0, 255, 0), 2);
}
return img;
}
};
int main() {
try {
// 初始化部署类
YOLOv5Deploy deploy("yolov5s_int8.bmodel");
// 推理
std::vector<DetectionResult> results;
cv::Mat result_img = deploy.infer("test.jpg", results);
// 保存结果
cv::imwrite("result.jpg", result_img);
std::cout << "检测到" << results.size() << "个目标" << std::endl;
for (const auto& res : results) {
std::cout << "类别:" << res.cls
<< ",置信度:" << res.conf
<< ",框:" << res.box << std::endl;
}
} catch (const std::exception& e) {
std::cerr << "错误:" << e.what() << std::endl;
return -1;
}
return 0;
}
3. 编译并运行 C++ 代码
# 创建build目录
mkdir build && cd build
# 编译
cmake ..
make -j4
# 运行
./yolov5_deploy
四、部署验证与性能优化
1. 部署验证
精度验证:对比部署结果与原始模型(如 PyTorch)的检测 / 分类结果,确保精度损失在可接受范围内。
性能测试:统计推理耗时,评估 FPS:
# Python性能测试示例
import time
start = time.time()
for _ in range(100):
outputs = engine.process(graph_name, {input_name: input_data})
avg_time = (time.time() - start)/100
print(f"平均推理时间:{avg_time*1000:.2f}ms,FPS:{1/avg_time:.2f}")
2. 性能优化技巧
使用 INT8 量化模型:相比 FP32 模型,INT8 模型推理速度提升 2-4 倍。
多批次推理:若模型支持,使用 batch>1 的输入(如[4,3,640,640]),提升吞吐量。
异步推理:使用sail::Engine的异步接口(process_async),隐藏数据传输耗时。
硬件资源优化:合理分配 NPU 内存(通过memory_edit.sh工具),避免内存不足。
预处理加速:使用 BMCV 硬件加速库(SDK 内置)替代 OpenCV 进行图像预处理,提升速度。
总结
关键点回顾
环境准备:CV186AH 核心板需安装sophon-sail库和 OpenCV 依赖,确保 BModel 模型可用。
部署方式:Python 适合快速验证,C++ 适合高性能应用,均基于sophon-sail统一接口。
核心流程:预处理(图像缩放 / 归一化 / 格式转换)→ 推理(调用引擎执行)→ 后处理(解析结果 / NMS)。
性能优化:优先使用 INT8 量化模型,结合硬件加速和批量推理提升效率。
通过以上步骤,即可在 CV186AH 核心板上完成模型的高效部署,充分发挥其 TPU 算力优势。
请用手机扫码查看分享内容
 需求留言:
需求留言:
领先的边缘智能产品与解决方案提供商


华北地区负责人:17340067106(毛经理)
华东地区负责人:17358670739(甘经理)
华南、华西地区负责人:19113907060(耿女士)
软件算法咨询:18982151213(刘先生)
四川省成都市武侯区天府五街花漾锦江JR大厦B座7层(总部)
 试用申请
试用申请

 硬件设备咨询
软件算法咨询
硬件设备咨询
软件算法咨询

 在线客服
在线客服

 回到顶部
回到顶部


 商城
商城